Over the last several years I've had Android head units in my truck (1995 Ranger), there's been some issues that have always bugged me... or I solved in a less than "ideal" manner. I've designed/ordered PCBs and ordered parts for a board to hopefully fix all of these in a better way, and I'd like to share the design here.
Attached is a .zip of the KiCAD files, Schematic, Gerber Files, and BOM from digikey (ok, it's a downloaded excel of my order I placed, close enough...)
The issues this board corrects are (and what I currently am doing that sucks):
Mounting: I didn't put any mounting holes in the design... I was planning on hot gluing some plastic sheeting to the bottom of the board (cut from some junk clamshell packaging or the like) and letting it hang in the stereo bay. Or velcro it to the top of the head unit; in my case, I have room to do so.
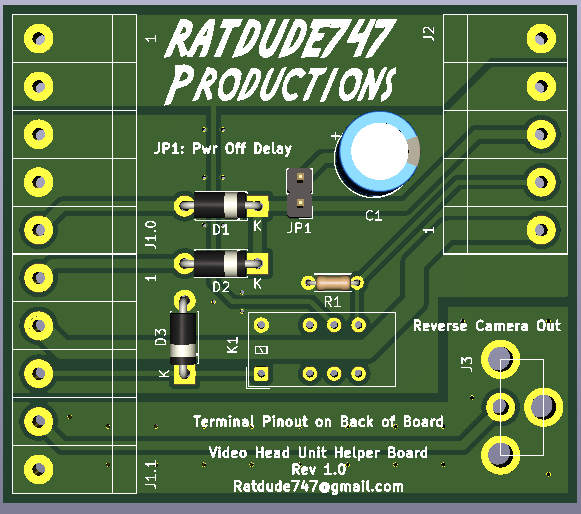
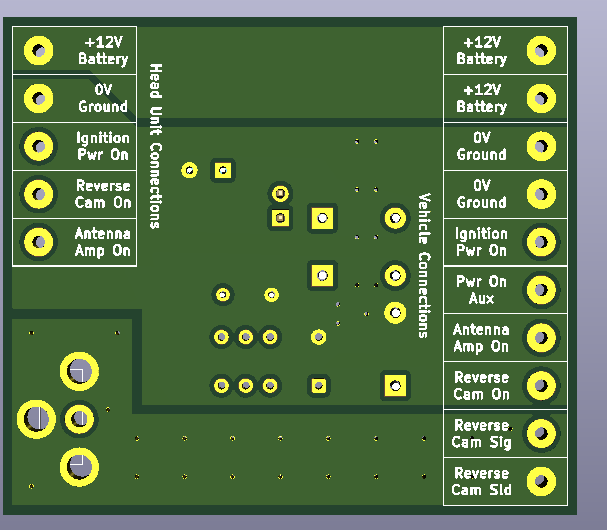
Screenshots of the board design:
Hopefully the boards and parts will come in soon... and then I can give her a spin.
Attached is a .zip of the KiCAD files, Schematic, Gerber Files, and BOM from digikey (ok, it's a downloaded excel of my order I placed, close enough...)
The issues this board corrects are (and what I currently am doing that sucks):
- This provides a power-off delay via a diode and capacitor; due to the fact that these units don't automatically pause when ignition power drops (heck, the touchscreen is still active!), this gives one several seconds after key-off to pause one's tunes. Otherwise, it will keep playing music in the background until the sleep timer kicks in and shuts down android. Not cool! Right now I have a 330uf 35V cap and a diode soldered into the harness; it's what I had at the time in the junk pile.
- Adds capability for a second power-on (ignition) input. No plans to do such, but adding it here was trivial (1 extra diode), and I had a terminal to spare.
- Relay isolates the reverse camera trigger signal. On my current unit, I've fought it for some time; my trigger isn't a "crisp" 0V->12V (it floats a lot), and without any correction, the head unit would randomly trigger the reverse camera screen (which blanks the screen and kills all physical switches/knobs). I've tried all sorts of resistor divider, diode isolation w/ pulldown, zener diode clipper, and opticoupler circuits but residual feedback/float would cause issues. Right now I have it in a steep resistor divider (1/3 ratio if memory serves), which mostly corrected the issue, but if reverse kicks on during bootup, the button lockout occurs until reverse is triggered again. I'm fed up with having to flash reverse to unlock my head unit at stoplights, and honestly this is why I am finally getting around to this project
- Eliminates all current harness splices in my setup. To facilitate this, two ground terminals on the vehicle side are provided (since I'm using an RCA adapter for my audio, which feeds the factory amp). The Antenna/Amp signal is routed through the board to allow for such, and the terminals and (hopefully) the power/ground fill areas are rated for the 15A the head unit maxes at (fuse rating).
- Eliminates the solder splices in the reverse camera cable. Due to the way my reverse camera is made (and the craptastic RCA plug they used), there used to be crimp splices on my RCA camera cable to allow it to enter the firewall via an existing grommet (for the shift cable). Those crimps failed, and I soldered it... and re-soldered it when I moved to a different Ranger. A short female-female RCA cable is needed to interface the board with the RCA jack on the board. No idea how well this will work; I didn't impedance analyze the relevant portion of the board (but I did via stitch the shield planes at least). I've seen composite video work on sketchier setups... we shall see. EDIT: Short RCA cables don't exist pre-made, but male-male couplers exist, which in my case, will work (if memory serves, my camera input is on a pigtail). Worst case I use a longer cable and coil it... or cut and re-plug it.
Mounting: I didn't put any mounting holes in the design... I was planning on hot gluing some plastic sheeting to the bottom of the board (cut from some junk clamshell packaging or the like) and letting it hang in the stereo bay. Or velcro it to the top of the head unit; in my case, I have room to do so.
Screenshots of the board design:
Hopefully the boards and parts will come in soon... and then I can give her a spin.
Attached Files
Comment